Welcome to my kitchen! This is a blog that is evolving as my life does. I like food, but I don't have all the time in the world to cook. So lately, I'm going with simple, easy recipes. I may switch that up occassionally and post something time-intensive, but that isn't what I'm about these days. If that sounds like you - I hope you enjoy some of these recipes.

Sunday, November 7, 2010

Ina Garten's Macaroni and Cheese

Sorry for the delay in posting... I haven't been cooking too much lately, other than quite bland foods that sound good to me at the time.  Because - I'm pregnant!  :)  Yay!  Although it doesn't inspire my palate in the least so I have had to cut back on the posting.  I will try my best to keep up better these next few months.

Onward to my first post in 2 months!

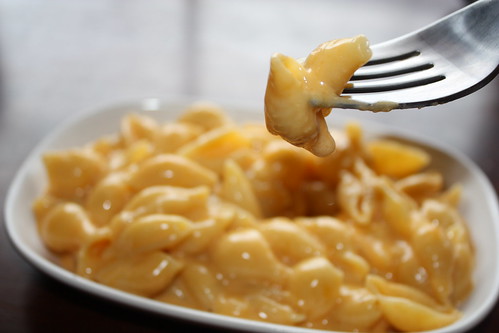
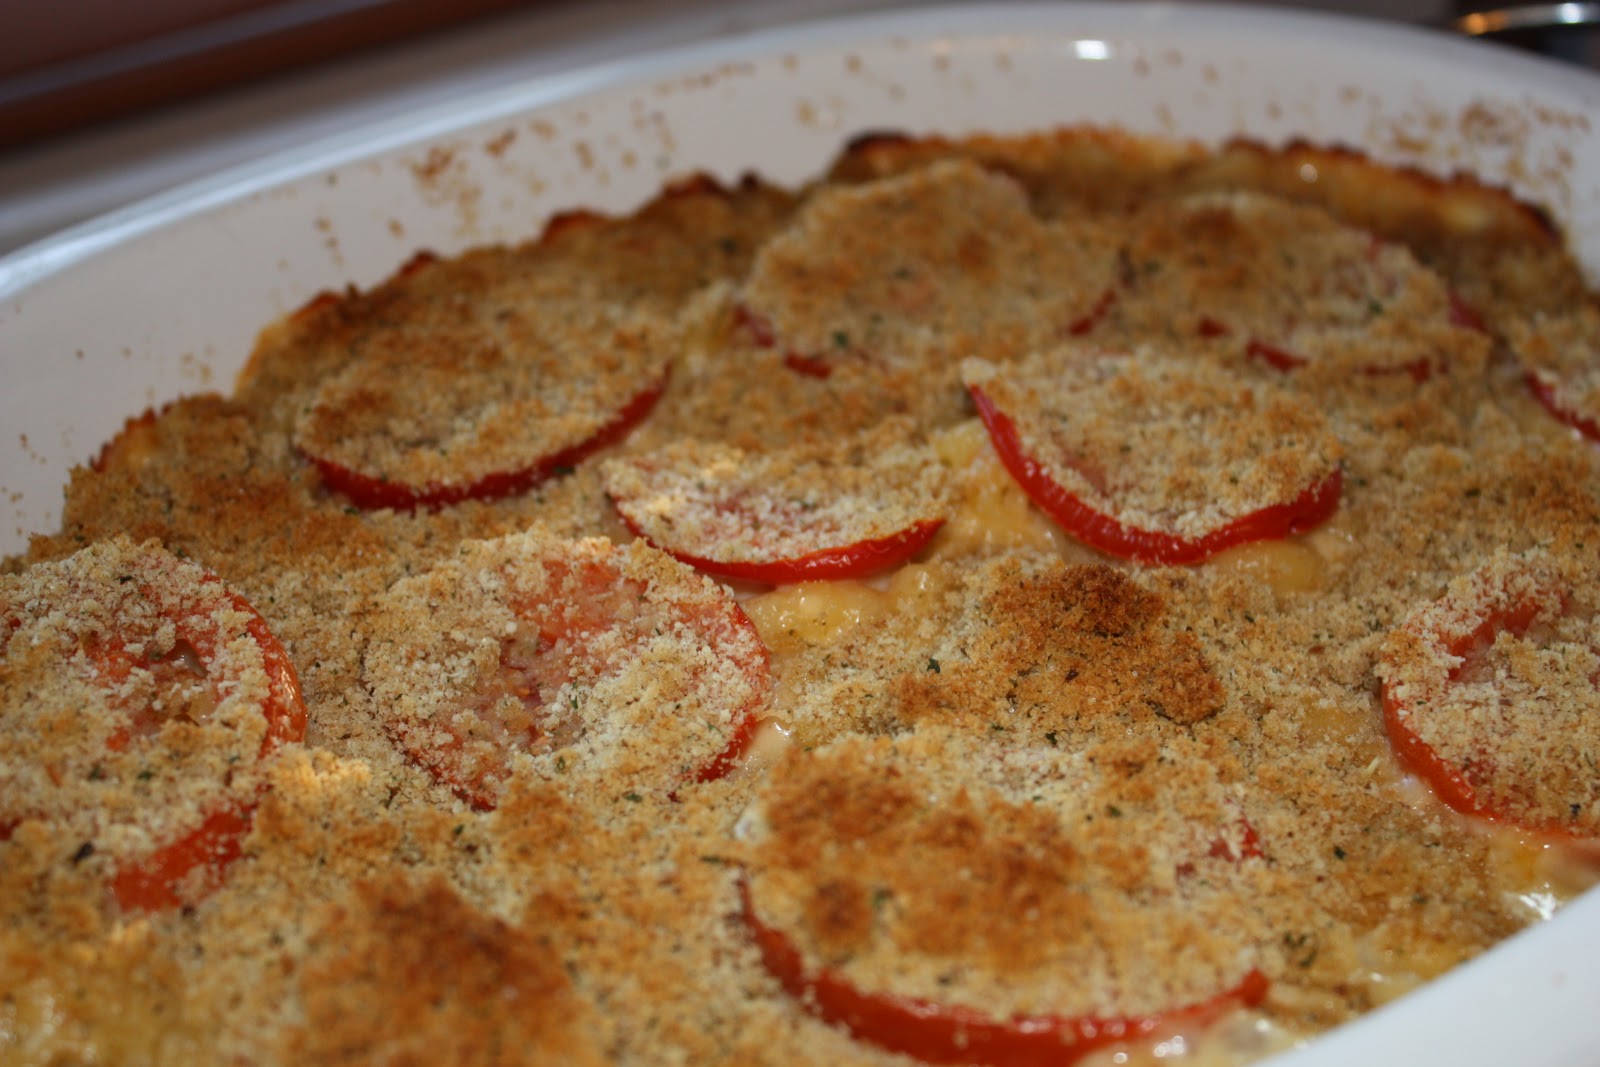
Because I had heard such great things, and because I love mac n' cheese.... I had to make this recipe for my own peace of mind.  And let me tell you - it's good people.  I loved the flavor of the Gruyere cheese and thought it added a twist to your regular mac n' cheese.  The cheese was creamy, and the topping added just enough crunch.  The tomatoes were perfectly cooked and I loved them, but if you didn't they're easy enough to pick out.


Barefoot Contessa Mac and Cheese
source: Foodnetwork.com, slightly adapted by Amy's New Kitchen
Serves 8

Ingredients:
  • Sea salt
  • 1 lb elbow macaroni
  • 1 qt milk
  • 1 stick unsalted butter, divided
  • 1/2 cup all-purpose flour
  • 12 oz Gruyere, grated (4 cups)
  • 8 oz extra-sharp Cheddar, grated (2 cups)
  • 1/2 tsp freshly ground black pepper
  • 1/2 tsp ground nutmeg
  • 4 small fresh tomatoes
  • 1/2 cup bread crumbs or Panko
Preheat oven to 375.


Cook pasta according to directions in salted water.  Al dente is my preference.


While the pasta is cooking, heat the milk in a small saucepan, be careful to keep it from boiling.  Melt 6 Tbsp butter in a large pot and add the flour.  Cook on low heat for 2 minutes and continually stirring with a whisk.  Continue whisking then add in the hot milk and cook until thickened slightly and smooth.  Remove from heat and add the cheeses, 1 Tbsp salt, pepper, and nutmeg.  Add in the cooked macaroni and stir well.  Pour into a baking dish.


Slice the tomatoes and arrange on top of the mac.  Melt the remaining 2 Tbsp of butter and combine with the breadcrumbs and sprinkle evenly over the mac and tomatoes.  Bake for 30 minutes until the cheese is bubbly and the breadcrumbs are slightly browned.


So this is healthy because it has tomatoes in it, right?  :)  Doesn't matter -it's worth all those delicious calories. 

Tuesday, September 7, 2010

Zucchini Pesto

Oh man, when I saw this recipe I knew I had to try it!  And since so many people at my work have green thumbs and grow giant zucchini, I needed more recipes just like this to keep my palate happy.


Zucchini Pesto
source: somewhere on the internet...but not really sure where.

Ingredients:
3 medium zucchini (or 1 gigantic homegrown one)
2 tsp sea salt
2 garlic cloves, minced
1/4 cup basil, shredded
1/2 cup almonds, toasted and finely chopped
1 Tbsp thyme leaves, chopped
1/2 cup finely shredded parmesan cheese
Juice from one lemon
1/2 tsp fresh lemon zest
3-4 Tbsp extra virgin olive oil
freshly cracked black pepper
extra sea salt if necessary


Using a box grater, coarsely grate the zucchini.  Place the shredded zucchini on a fresh kitchen towel and sprinkle with salt.  Allow to sit for 5 minutes.  Squeeze the towel to remove all excess moisture that you possibly can.


Put zucchini in a medium sized bowl.  Add the garlic, basil, almonds, thyme, parmesan, lemon juice, lemon zest and 3 Tbsp olive oil.  Stir until well combined.  Add pepper and taste.  Add more salt and olive oil, a little at a time, if necessary.  Refrigerate for at least an hour before serving. 


Serve with pita, pita chips, toasted ciabatta bread, crackers, etc. 

Friday, September 3, 2010

Corned Beef Tacos

What do you get when you cross and Irishman and a Mexican?  Corned Beef Tacos!  Since marrying an Irishman I have learned to love corned beef.  And cabbage.  Something I'm sure my mom never thought would happen.  But since it has, I wanted to start using it more than just on St. Patrick's Day since it's so easy to make.  I like to cook it in my slow cooker, forget about it for 8 hours, then serve!


Corned Beef Tacos
Serves 4

1 6lb corned beef brisket
1 package soft white corn tortillas
cabbage, thinly sliced
thousand island dressing
horseradish (optional)


Cook your brisket along with it's juices from the package and spice packet in water (until just covered) in a slow cooker for 8 hours on low (or 4 hours on high, then one additional hour on low).  Remove the layer of fat then shred the brisket and keep set on 'warm' in the juices.


Warm the tortillas up in the microwave in a towel for 10-15 seconds.  Take your tortilla and layer the shredded corned beef, cabbage, thousand island and horseradish.  Serve!


It really is that easy and we thought this was a great combination of flavors.  It's a nice twist on a reuben, a taco, and corned beef and cabbage.   Oh, it's a little messy, so keep napkins handy!

Tuesday, August 31, 2010

Roasted Red Pepper Hummus

Hummus was invented to make me happy, I think.  It's so simple yet can have so many different flavors and versions.  That makes it a fantastic snack or appetizer.  And it's fairly healthy too!  Woot!  This is by far the best hummus I've had and Jeff agreed.  It's soooo good!  Slightly sweet, a little spicy, mmm mmmm.  And I love the color.  It makes a festive addition to any meal.


Roasted Red Pepper Hummus
source: Allrecipes.com, slightly adapted by Amy's New Kitchen
serves: 6-8

Ingredients:
1 (15 oz) can garbanzo beans, drained-reserving the juice
4 oz roasted red peppers
Juice of 1 lemon
1 1/2 Tbsp tahini
1 clove garlic, minced
1/2 tsp cumin
1/2 tsp cayenne pepper
1/4 tsp salt


In a food processor combine all ingredients and pulse/blend until smooth.  Add some of the reserved garbanzo bean juice if necessary to acquire the consistency you desire.  (I probably used 3-4 Tbsp)  Make sure to scrape the bottom and sides of the bowl to ensure all ingredients are well blended.  Serve immediately or store in the fridge until ready to serve.

Sunday, August 29, 2010

Butter Chicken

I love Indian food.  Why?  Because it almost always involves chicken and rice!  I have never tried Butter Chicken at a restaurant before but I thought it sounded interesting so I went ahead and tried it even though I had no idea what I was in store for.  It was good.  I wouldn't say I loved it but Jeff did!  So I am posting it anyway because I know this recipe is capable of people loving it and maybe that person is you! 


Indian Butter Chicken
source: Joelen of What's Cookin', Chicago?, slightly adapted by Amy's New Kitchen
serves: 6

Ingredients:


1 Tbsp vegetable oil
1 lb boneless, skinless chicken thighs, cut into bite-size pieces
1/2 tsp garam masala
1/4 tsp cayenne pepper


1 Tbsp vegetable oil
1 white onion, chopped
2 Tbsp unsalted butter
2 tsp fresh lemon juice
1 Tbsp ginger, finely grated
1 clove garlic, finely grated
1/2 tsp garam masala
1 tsp chili powder
1 tsp ground cumin
1 bay leaf
2 cups tomato puree
1 jalapeno, seeded and diced
1 cup heavy cream
1/4 cup plain yogurt
1/4 cup chopped fresh cilantro
1/4 teaspoon cayenne pepper
1 pinch salt
1 pinch black pepper
1/4 cup finely ground cashews


Heat 1 Tbsp oil in a large skillet over medium heat.  Add chicken and season with 1/2 tsp garam masala and 1/4 tsp cayenne pepper.  Cook until lightly browned, about 10 minutes. 


Meanwhile, prepare the sauce by heating 1 Tbsp oil in a large saucepan on medium high heat.  Saute onion until soft and translucent.  Stir in butter, lemon juice, ginger, garlic, garam masala, chili powder, cumin and bay leaf.  Cook, stirring for 1 minute.  Add tomato puree and jalapeno and cook for 5 minutes, stirring frequently.   Stir in cream, yogurt and cilantro.  Reduce heat to low, and add the browned chicken.  Simmer for 10 minutes, stirring frequently.  Season with salt and pepper to taste.  Just before serving, add the ground cashews and stir.  


Serve over steamed basmati rice.


 Does that not look awesome?  We had this with pita and Roasted Red Pepper Hummus!  More on that later! 

I made some slight changes to the amounts of ingredients from Joelen's version of this recipe.  There was a little too much garam masala for my taste so I halved it in my recipe.  I also added a jalapeno pepper because I think it would've added a little kick and really put this dish over the top!

Wednesday, August 25, 2010

Mexican Rice

What can I say?  I'm making another rice recipe.  :)  My dad makes the best Mexican food ever.  Maybe I'm a little biased but who cares-I love it and that's all that matters.  Ha!  But if you would like to know what it tastes like too, here is his 'recipe' (I use that term loosely as the man never measures-he just eyeballs amounts of ingredients) and I hope you like it too!


Mexican Rice
serves: 5

Ingredients:
2 Tbsp vegetable oil
1/2 tsp sea salt
3/4 cup long grain rice
1 (4oz) can Mexican flavors tomato sauce
1 1/2 cups water
1 clove garlic, minced
1 tsp freshly cracked black pepper
1 1/2 tsp camino (cumin)
1/2 white onion, sliced
1-2 jalapenos, seeded and quartered lengthwise


Heat oil in a skillet and add rice and salt.  Stir frequently on medium heat until the rice grains become larger and start to look a little whiter.  About 5 minutes or so.  Add tomato sauce, water, garlic, pepper, and camino then stir until combined.  Place the onions and the jalapenos on top of the rice.  Cover and simmer on medium to low heat for 18-20 minutes.  Fluff with fork and serve.


You can choose to eat the vegetables or discard them if the pieces of peppers are too hot or that much onion flavor isn't your thing.  I leave them in and cut them up on my plate and mix them right back into the rice!  So tasty and reminds me of growing up.  This recipe isn't exactly how my dad used to make it but I am working on it.  One day I hope to perfect it.

Monday, August 23, 2010

Shredded Chicken

Tacos, tostadas, enchiladas, nachos, taco salad, and burritos are just a few things that I can think of that this chicken would be perfect for.  This was a really fresh dish since it uses fresh vegetables for flavor and not just a packet of taco seasoning mix to go with it.  We used the meat to make chicken tacos but there was so much leftover that we saved some for lunches the next day and froze some so that I can make chicken enchiladas when the weather starts to turn cooler.  And the chicken was so tasty I can't wait for those enchiladas!


Shredded Chicken
source: Food.com, slightly adapted by Amy's New Kitchen
servings: depends on what you're making with it.  About 8-10 servings.

Ingredients:
  • 4 boneless skinless chicken breasts  
  • 1/2 medium onion, sliced
  • 2 garlic cloves,  smashed
  • Tbsp sea salt 
  •  water
  • Tbsp butter
  • 1 garlic clove, minced
  • 1/2 medium onion, diced
  • 1 medium tomato, seeded and diced
  •  3/4 green bell pepper, diced 
  • 1 jalapeno, diced (seeded if you prefer less heat)
  • 1 1/2 tsp freshly grated black pepper
  • 1/4 cup cilantro, chopped
  • 2 tsp ground cumin
  • 1/4 cup tomato sauce 
  • 1 1/2 tsp sea salt
  • chicken broth (reserved) 
Place chicken, onion slices, garlic cloves and add just enough water to cover the chicken in a large pot.  Bring to a boil, cover and lower heat to a simmer.  Continue cooking for 25 minutes.


Remove chicken from broth, let cool, then shred.  Reserve the broth for later.


Meanwhile, while the chicken is cooling saute the butter, garlic clove, onion, tomato, bell pepper, jalapeno, pepper, cilantro, and cumin for 10 minutes.  Stir in shredded chicken then briefly saute.  Add tomato sauce, salt and 1/2 cup of chicken broth at a time until the chicken is as juicy as you like.

Saturday, August 21, 2010

Simple Caprese Salad

It's summertime and my mom's homegrown tomatoes are rockin'!  I wanted to use them in a simple, fresh way since I don't always get delicious homegrown tomatoes.  Since I already had mozzarella - caprese salad was the obvious choice!


Caprese Salad
Serves 8

Ingredients:
1 cucumber
4 medium tomatoes
12 oz fresh mozzarella
fresh basil
olive oil
balsamic vinegar


Peel the cucumber and slice into 1/4 inch slices.  Remove stems and slice the tomatoes and the mozzarella.  Take the fresh leaves from the basil and add all those ingredients together in a bowl and drizzle with olive oil and balsamic vinegar. 


Place on a platter in individual portions, stacked with the cucumber on the bottom, tomato, mozzarella and a basil leaf on top. 


This is a light, tasty appetizer or side dish to add to any Italian or summertime dish.  I love the fresh basil and the fresh vegetables.  It doesn't get much better.

Monday, August 9, 2010

Bow-tie Lasagna

Everyone who loves lasagna knows the only thing that could make it better would be to be able to make it quicker!  :)  Well, this is a great solution to that problem.  It's not exactly like lasagna, but you get the idea from the flavors in the dish.


Bow-tie Lasagna
Source: Tasty Kitchen
Serves 6

Ingredients:
1 lb ground chuck
5 cups bow tie pasta
1 jar spaghetti sauce
1 Tbsp olive oil
1 tsp sea salt
1/2 tsp garlic powder
1 tsp garlic powder (I used about 1 1/2 tsp)
1/2 cup mozzarella cheese, shredded
1/2 cup sour cream


Fry ground chuck in small pan. Meanwhile, cook noodles according to package directions.


After noodles are cooked, drain and drizzle with olive oil. Mix in the spaghetti sauce.


Add the meat, salt, garlic powder cheese, and sour cream. Mix together until combined and cheese is melted.  Serve immediately.


We served this with a simple caprese salad and some roasted garlic bread and it was perfect for a quick weeknight meal.  It really does taste like lasagna and makes great leftovers.  I'm a fan of this dish, a big one.

Monday, August 2, 2010

Wheat Buttermilk Waffles

I'm becoming a huge Alton Brown fan.  Every recipe that I've tried of his is delicious.  And this one really makes me happy.  It's so good, so easy and the batter doesn't stick to the waffle iron.  Bonus!


Basic Waffles
source: Alton Brown, Food Network
servings: 5 Belgian waffles

Ingredients:
1 cup all-purpose flour
1 cup whole-wheat flour
1/2 tsp baking soda
1 tsp baking powder
1 tsp sea salt
3 Tbsp sugar
3 whole eggs, beaten
4 Tbsp unsalted butter, melted
2 cups buttermilk, room temperature


Preheat waffle iron.


In a medium bowl whisk together the flours, soda, baking powder, salt, and sugar. In another bowl beat together eggs and melted butter, and add the buttermilk last.  Combine the wet ingredients with the dry and stir until combined.  Let sit for 5 minutes.


I like to spray some oil onto the iron using my oil pump filled with olive oil.  Ladle the recommended amount of waffle batter onto the iron according to the manufacturer's recommendations. Close and cook until the waffle is golden on both sides and is easily removed from iron. Serve immediately or keep warm in a 200 degree F oven until ready to serve. 


These waffles are nice and crunchy on the outside, and soft and fluffy in the middle.  I think I would rather stay in and cook these waffles than eat out at most breakfast places.  Alton Brown-you're my hero.

Thursday, July 29, 2010

Sweet n' Spicy Zucchini Pickles

There are lots of recipes out there for zucchini, but plenty of them involve baking or frying.  Neither of which I was up for the other night, so when I found this recipe for Sweet n' Spicy Zucchini Pickles in the latest issue of Cooking Light I was excited!  I hadn't heard of zucchini pickles before but they sounded like fun to me so I made them.  Why not?  They're yummy and totally delicious by themselves as a light snack or on hamburgers or anything that you would use regular pickles for with an extra kick! 


Sweet n' Spicy Zucchini Pickles
source: Cooking Light, August 2010 issue
serves: makes full 2 Ball jars of pickles

Ingredients:
4 cups zucchini, sliced in 1/8" slices
1 cup sweet onions, slivered
3 garlic cloves, thinly sliced
1 cup white vinegar
1/2 cup sugar
3/4 tsp crushed red pepper flakes
1 tsp mustard seeds
3/4 tsp sea salt


Combine vinegar, sugar, red pepper flakes, mustard seeds and salt in a small sauce pan.  Bring to a boil.  While mixture is coming to a boil combine zucchini, onions, garlic in 2 Ball jars.  Pour half the vinegar mixture over the zucchini in each jar.  Fill the rest of the way up with water and refrigerate for at least 24 hours before serving. 


These pickles are so pretty!

These zucchini pickles don't give off their heat right away, but after chewing for a few seconds you will feel the kick!  Then the sweet kicks back in and the flavor that is left in your mouth is fresh and summery.

Wednesday, July 28, 2010

London Broil with Cherry Balsamic Sauce

This was a great dinner to make on a weeknight.  Because it's easy, quick, and filling!  The sauce is absolutely delicious and compliments the meat perfectly.


London Broil with Cherry Balsamic Sauce
Source: Food Network
Serves 6

Ingredients:
(I recommend doubling this top batch of ingredients and then dividing them)
1/3 cup, dry red wine
1/4 cup balsamic vinigar
2 Tbsp cherry preserves
2 cloves garlic, minced
1/2 tsp sea salt
Freshly ground black pepper, to taste


1 1/2 lbs London Broil
1 shallot, finely chopped
1 tsp olive oil
2 tsp butter


Whisk wine, vinegar, cherry preserves, garlic, salt and pepper in a small bowl. Place meat in a shallow glass dish. Pour the marinade over the meat and turn to coat. Cover and marinate in the refrigerator, turning several times, for at least 1 hour (or up to 8 hours).


Remove the meat from the marinade. Pour the marinade into a small saucepan (I made a second batch and threw this original marinade away); add shallot and set aside. Oil a cast iron skillet and heat on medium-high. Add the meat and cook for 6 to 8 minutes per side for medium-rare, or until it reaches desired doneness. (Cooking time will depend on thickness.  It may appear that the meat is burning but don't worry, it will form a pleasant crust.) Transfer meat to a cutting board and let rest for 5-10 minutes.


While the meat is cooking, bring the marinade to a boil.  Cook over medium-high heat for 5 to 7 minutes, or until it is reduced to about 1/2 cup. Remove from the heat; add butter and whisk until melted.


Slice meat thinly against the grain. Add any juices on the cutting board to the sauce. Serve the meat with the sauce drizzled on top.


This was really great and serves plenty!  I love doing London Broils because start to finish (not including the marinade time which I recommend doing for as long as you can.  It will really help this tough cut of meat to tenderize and become that much more flavorful!) this meal takes less than 30 minutes.  It doesn't get much easier than that and it tastes amazing.  The flavors really mesh in the sauce and makes the house smell spectacular.

Sunday, July 25, 2010

Grilled Artichokes with Lemon Mayonnaise Dip

The only way to make an artichoke any more delicious is to grill it.  Jeff and I love to eat out at a restaurant here in Denver called the Cherry Creek Grill.  They have the most amazing seasonal grilled artichokes on their menu and I've always wanted to recreate them at home.  (Although whatever sauce they use is absolutely amazing and I have no idea what is in it.  I will have to see if the waiter will give me some insight next time we're there.)


Grilled Artichokes
Serves 4

Ingredients:
2 cloves garlic
1 bay leaf


2 large artichokes
garlic powder
parsley
sea salt
freshly ground black pepper
1 lemon, halved
olive oil for drizzling


Fill a large pot with about 1" of water and add the garlic cloves and bay leaf to the water.  Place a steamer basket in the water and bring to a boil.


While waiting for the water to boil, prepare the artichokes by washing them then cutting about 1/4" off the end of each stem.  If you like, you can use a vegetable peeler to peel the tough outer layer of the stems away.  Cut about an inch off the tops and trim the pointy tips of the leaves with kitchen shears. 


Place on steamer basket and steam for 20-30 minutes depending on size of artichoke.  You will be able to insert a knife easily into the end of the stem when they are done.  Remove from the pot and set aside to cool for about 10 minutes.  Cut in halves or quarters depending on how many people you will be serving.  Using a sharp knife remove the choke and any purple leaves on the inside of each artichoke.


Preheat your grill.  I like the flavor of a charcoal grill but a gas grill works just fine.  Lightly spread leaves apart and sprinkle garlic powder, parsley, salt and pepper in between the leaves and on the inside.  Squeeze fresh lemon juice on top and drizzle the flat parts of each artichoke with olive oil. 


Grill the artichokes leaf-side down.  Then turn them over and grill just until the tips of the leaves char a little and get some flavor to them.  Remove and serve immediately(with lemon mayonnaise!).

(I forgot to cut out the chokes and inside leaves before we grilled these, so I just did it afterward.)


Lemon Mayonnaise 
Source: Emeril Lagasse, Food Network, slightly adapted by Amy's New Kitchen
Serves: 6-8 portions

2 lemons, halved
1 large egg*
2-3 Tbsp water
1/2 cup olive oil
1/2 cup vegetable oil
1/2 tsp salt
1/2 tsp cayenne


Squeeze the lemon juice into the bowl of a small food processor.  Add the egg* and 1 Tbsp water and process for 20 seconds.  With the processor running slowly pour in the olive oil and vegetable oil through the feed tube and process until emulsified.  (Add additional water, 1 Tbsp at a time to thin the mayo if you like.)  Add the salt and cayenne, pulse to blend.  Transfer to an airtight container and refrigerate for at least an hour before serving.  (Mayo can be refrigerated for up to 24 hours.)

*RAW EGG WARNING (from FoodNetwork.com)
Food Network Kitchens suggest caution in consuming raw and lightly-cooked eggs due to the slight risk of Salmonella or other food-borne illness. To reduce this risk, we recommend you use only fresh, properly-refrigerated, clean, grade A or AA eggs with intact shells, and avoid contact between the yolks or whites and the shell.

Saturday, July 24, 2010

Individual Egg Muffins

I wanted to find a recipe that is easily served, for people on the go, and that doesn't require extra serving utensils or plates.   Kalyn has a fantastic egg muffin recipe that was exactly what I had in mind.  These are so fun and easy-I will be making different variations of this breakfast treat and hopefully come up with some great creations.


Individual Egg Muffins
source: Kalyn's Kitchen, slightly adapted by Amy's New Kitchen
Serves: 12 muffins

Ingredients:
12 Eggs
2 tsp Rosemary
2 tsp Thyme
2 tsp Garlic
3/4 tsp Sea Salt
5 Green Onions, thinly sliced
4 oz Extra Sharp Cheddar Cheese, shredded
Veggies - use any veggies you like.  I used shredded potatoes, pre-cooked on the stovetop


Preheat oven to 350º.  Line 12 muffin cups with 2 paper liners each.  Spray the liners with nonstick cooking spray.


Layer the muffin cups with potatoes on the bottom, green onions, whichever other veggies you choose, and the cheese until the cups are about 2/3 full.  Break the eggs into a measuring bowl or small pitcher with a pour spout.  Add the spices and beat well.  Pour the eggs evenly into each muffin cup until the cups are about 3/4 full.  Bake 25-30 minutes or until the muffins have risen and are set to the touch.


Kalyn also gives a little tip that the egg muffins will keep for a week in the refrigerator without freezing.  But they can also be frozen and reheated as well.  For best results-thaw them in the fridge before reheating.  Microwave to reheat.

Thursday, July 22, 2010

Stove Top Mac n' Cheese

I was looking for a stove top recipe for mac n' cheese because I didn't want to use my oven in this hot, hot summertime heat.  It was suggested by Jen at Beantown Baker that I try Alton Brown's recipe.  She said it was awesome and she was right!  It's the creamiest and easiest macaroni recipe I've ever made and am so happy to have it in my recipe box now!


Alton Brown's Stove Top Mac n' Cheese
Source: Alton Brown, Food Network, slightly adapted by Amy's New Kitchen
Serves: 4

Ingredients:
1/2 lb macaroni (I used shells)
4 Tbsp unsalted butter
2 eggs
6 oz evaporated milk
1/2 tsp hot sauce
1 tsp sea salt
Freshly cracked black pepper, to taste
3/4 tsp dry mustard
8 oz sharp cheddar, shredded
4 oz monterey jack cheese, shredded


In a large pot of boiling, salted water cook the pasta to al dente and drain. Return to the pot and melt in the butter. Toss to coat.

Whisk together the eggs, evaporated milk, hot sauce, salt, pepper, and mustard. Stir into the pasta then add the cheese. Over low heat continue to stir for 3 minutes or until creamy.


I doubled this recipe from the start because I just knew I was going to want leftovers!  I would suggest to everyone, just go ahead and double it-you will wish you had if you didn't!  :)

Tuesday, July 20, 2010

Curried Rice Pilaf

OhMyGod, I love rice!  Not really sure why, but I have loved rice since I was just a little thing.  And I've been known to just eat a big old bowl of plain white rice for lunch or dinner, oh-and breakfast too.  Now that I've started experimenting more with flavoring my rice I'm much more open to 'tainting' my rice now that I know how much more I can like it.  (Honestly-I didn't even think that was possible!)

This recipe is a simple, tasty way to upgrade a side dish of rice!


Curried Rice Pilaf
source: Food Network, June 2010 magazine edition
Serves 4

Ingredients:
1 small onion, diced
2 cloves garlic, smashed
zest of one small lemon
1/2 tsp Curry Powder
pinch of Turmeric
1 cinnamon stick
1 Tbsp unsalted butter
1 tsp olive oil
1 cup basmati rice
1 1/3 cups water
1/2 tsp sea salt
Juice from half a lemon
1/8 cup chopped cilantro
1/4 cup cashews, chopped


Saute onion, garlic, lemon zest, curry powder, turmeric, and cinnamon stick in a saucepan with the butter and olive oil until lightly browned.  Add rice and stir until lightly toasted.  Add water, season with salt then bring to a boil.  Cover and simmer for 15 minutes.  Let sit for 5 minutes, fluff with a fork, add lemon juice, cilantro and cashews and serve immediately. 


I can't wait to make gyros and make this rice again to accompany them!  It's not exactly traditional rice to go with gyros, I just think it sounds good!

Saturday, July 17, 2010

No Mayo Chicken Salad

It's summertime, which means it's camping season!   And it's time to start making some recipes that can be made ahead of time and taken with us on our camping trips.  My husband doesn't like mayo, so this was my solution to a dish usually slathered in it.


No Mayo Chicken Salad
Serves 4

Ingredients:
2 chicken breasts, seasoned and grilled, cooled then cubed
1 (8oz) container of plain yogurt
2 celery stalks, thinly sliced
3 stalks green onion, thinly sliced
1/2 tsp parsley
1/2 tsp dill
1/8 tsp  celery salt
1/4 tsp sea salt


Combine all ingredients together in a medium sized bowl and stir until thoroughly mixed.  Serve on bread for sandwiches or in a bowl for a nice simple lunch dish.  Serve cold.


This recipe could easily be changed up by adding some hard boiled eggs and some diced baby dill pickles to the mix.  Or another version could have diced granny smith apple pieces and sliced grapes.  Adding toasted walnuts to that would be really good too!  Mmmm, I might have to try that one next time.  :)

Monday, July 12, 2010

Chicken, Provolone & Roasted Red Pepper Panini

Whenever I have leftover meats from the grill I try to do something new so we aren't necessarily eating the same meal again the next day.  I had a leftover grilled chicken breast from the other night and wanted to try my hand at creating a panini.  And I think it just might be a new addiction. I am definitely going to keep checking out this Panini Blog for inspiration!  All paninis, all the time.


Chicken, Provolone & Roasted Red Pepper Panini
Source: Panini Happy, adapted by Amy's New Kitchen
Serves 4

Ingredients:
1 loaf ciabatta bread
Hummus
Fresh Dill
1 large Chicken Breast, seasoned and grilled, sliced lengthwise
1 Roasted Red Pepper, sliced lengthwise
6 slices deli-style Provolone Cheese
8 slices Turkey Bacon, cooked (optional)


Slice ciabatta loaf in sections perfectly sized to your liking.  Slice in half and spread a generous amount of hummus onto the inside of each slice.  Sprinkle freshly chopped dill onto hummus on both sides of bread again.  Then layer on the bottom slice of ciabatta, chicken, roasted red pepper slices, provolone then bacon.  Top with the top half of ciabatta bread.


Grill sandwiches for ~5 minutes on each side of bread.  The cheese will melt and nice grill marks should form on both sides of the bread.


Look at that gooey awesomeness!!  I used a cast iron grill pan on my stove top and another cast iron pan on top of the sandwiches weigh them down and keep them in place while grilling.  I'm sure it works better if you have a panini press but my way got the job done.  And since it did work- that means I can make grilled paninis any season of the year!

Thursday, July 8, 2010

Salted Toffee Chocolate Squares

 Craving something salty?  Craving something sweet?  I've got the treat for you!


Salted Toffee Chocolate Squares
source: Everyday Food by Martha Stewart, adapted by Amy's New Kitchen
serves 12

Ingredients:
  • 13 graham crackers
  • 1 bag (8 oz) toffee bits
  • 1 1/2 cups almonds, toasted & coarsely chopped
  • 1/2 cup sugar
  • 1 cup (2 sticks) unsalted butter
  • 3/4 cup semi-sweet chocolate chips
  • 3/4 tsp coarse salt
Preheat oven to 350º. Line a rimmed baking sheet with foil. Crush graham crackers and place in an even layer on the bottom of sheet. Sprinkle toffee bits and almonds over graham crackers.


In a small saucepan, bring sugar and butter to a boil over medium-high. Reduce heat and cook at a rapid simmer, swirling pan occasionally, until mixture is syrupy, ~2 minutes. Immediately pour evenly over graham crackers. Bake until sugar topping is bubbling, ~12 minutes. Remove from oven and immediately sprinkle chocolate chips and salt over graham crackers. 


With a sharp knife or pizza cutter, cut into 2-inch squares. Let cool completely on sheet on a wire rack. (Store in an airtight container, up to 1 week.)  


The original recipe calls for the graham crackers to be placed whole on the bottom of the cookie sheet.  The way I did it, they make a nice graham cracker crust and once cooled, the foil peels away easily to perfectly cut squares.

Tuesday, July 6, 2010

Jambalaya

I make a lot of chicken and rice.  I'm not gonna lie.  But I'm always trying to come up with more flavorful ways to cook it.  Jambalaya seems to fit that bill!


Jambalaya
Original recipe: Cooking Light  Adapted by Amy's New Kitchen
Serves 5

Ingredients:
  • 2 tsp vegetable oil
  • 1 cup chopped onion
  • 1/2 cup green bell pepper, chopped
  • 1/2 cup red bell pepper, chopped
  • 2 jalapenos, seeded and chopped
  • 3 cloves garlic, minced
  • 1 3/4 cups uncooked, long-grain white rice
  • 3 cups low-sodium chicken broth
  • 2 tsp paprika
  • 1 tsp oregano
  • 1 tsp freshly ground black pepper
  • 1/2 tsp dried thyme
  • 1/4 tsp  ground cayenne pepper
  • 1 bay leaf
  • 1 tsp of your favorite hot sauce (or to taste)
  • 1 can (14.5 oz) diced tomatoes, undrained
  • 1 can (6 oz) tomato sauce
  • 2 boneless, skinless chicken breasts, seasoned then grilled and cut into bite-sized pieces
  • 3 beef smoked sausages, grilled and cut into bite-sized pieces
Heat oil in a a dutch oven over medium-high heat.  Add onion, bell peppers, jalapenos and garlic and saute 5 minutes or until vegetables are becoming tender.


Stir in rice, cook 2 minutes, stirring constantly. Add broth, paprika, oregano, black pepper, thyme, cayenne pepper, bay leaf and hot sauce; bring to a boil. Cover, reduce heat, and simmer 15 minutes. Add chicken, sausage, tomatoes and tomato sauce; cook, uncovered, 5-10 minutes or until liquid is absorbed.  Remove from heat and remove bay leaf.  Let stand 5 minutes.


This is a fun and easy recipe that is a great weeknight meal.   It's not too spicy but has a nice kick to it that won't let you down.  Make some cornbread, or maybe some Garlic Cheddar Biscuits on the side and you've got yourself a seriously delicious meal! 

Friday, July 2, 2010

Garlic Cheddar Biscuits

Why do people go to Red Lobster?  For those amazing cheddar biscuits of course!  Well, I know that's why I go anyway.  Since I'm allergic to seafood - it's pretty much my only option on their menu.  So when I heard of recipes out there that are damn close to the real thing, I jumped on that grenade.


Garlic Cheddar Biscuits
Source: Paula Deen, God love her.
servings: 12 biscuits


Biscuit Ingredients:
1 1/4 cup biscuit mix
1/2 cup sharp cheddar cheese, grated
1/2 cup water


Garlic Butter Ingredients:
1/2 stick unsalted butter, melted
1/4 tsp garlic powder
1/4 tsp sea salt
1/8 tsp dried parsley flakes


Preheat oven to 400º.  Line a baking sheet with parchment paper.


Combine the biscuit mix and cheese in a small bowl.  Add the water and stir until just combined.  Drop the dough by the spoonful onto the parchement paper.  Bake for 10 minutes.  The biscuits will just be beginning to brown.


Meanwhile, while the biscuits are baking, make the garlic butter by combining the melted butter, garlic powder, salt and parsley in a small bowl.  As soon as the biscuits are removed from the oven brush each with the garlic butter.  Serve warm.


These were amazing!  They were the first thing at dinner that everyone sunk their teeth into.  And between 5 people, there weren't any left by the end of the meal.

And on that note-it's time to get out of Dodge.  It's the July 4th weekend and we're getting out of here!  Camping here we come.   I hope everyone has a safe and happy 4th and thank you to all the soldiers for keeping us free and independent!

Biscuit Method on Foodista