Welcome to my kitchen! This is a blog that is evolving as my life does. I like food, but I don't have all the time in the world to cook. So lately, I'm going with simple, easy recipes. I may switch that up occassionally and post something time-intensive, but that isn't what I'm about these days. If that sounds like you - I hope you enjoy some of these recipes.

Showing posts with label sausage. Show all posts

Tuesday, July 6, 2010

Jambalaya

I make a lot of chicken and rice.  I'm not gonna lie.  But I'm always trying to come up with more flavorful ways to cook it.  Jambalaya seems to fit that bill!


Jambalaya
Original recipe: Cooking Light  Adapted by Amy's New Kitchen
Serves 5

Ingredients:
  • 2 tsp vegetable oil
  • 1 cup chopped onion
  • 1/2 cup green bell pepper, chopped
  • 1/2 cup red bell pepper, chopped
  • 2 jalapenos, seeded and chopped
  • 3 cloves garlic, minced
  • 1 3/4 cups uncooked, long-grain white rice
  • 3 cups low-sodium chicken broth
  • 2 tsp paprika
  • 1 tsp oregano
  • 1 tsp freshly ground black pepper
  • 1/2 tsp dried thyme
  • 1/4 tsp  ground cayenne pepper
  • 1 bay leaf
  • 1 tsp of your favorite hot sauce (or to taste)
  • 1 can (14.5 oz) diced tomatoes, undrained
  • 1 can (6 oz) tomato sauce
  • 2 boneless, skinless chicken breasts, seasoned then grilled and cut into bite-sized pieces
  • 3 beef smoked sausages, grilled and cut into bite-sized pieces
Heat oil in a a dutch oven over medium-high heat.  Add onion, bell peppers, jalapenos and garlic and saute 5 minutes or until vegetables are becoming tender.


Stir in rice, cook 2 minutes, stirring constantly. Add broth, paprika, oregano, black pepper, thyme, cayenne pepper, bay leaf and hot sauce; bring to a boil. Cover, reduce heat, and simmer 15 minutes. Add chicken, sausage, tomatoes and tomato sauce; cook, uncovered, 5-10 minutes or until liquid is absorbed.  Remove from heat and remove bay leaf.  Let stand 5 minutes.


This is a fun and easy recipe that is a great weeknight meal.   It's not too spicy but has a nice kick to it that won't let you down.  Make some cornbread, or maybe some Garlic Cheddar Biscuits on the side and you've got yourself a seriously delicious meal! 

Thursday, April 22, 2010

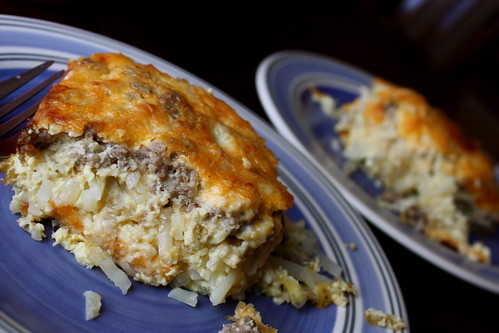
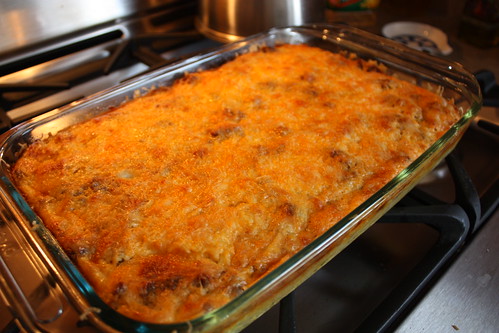
Sausage, Egg and Hash Brown Bake

I find something comforting about a hot breakfast casserole in the morning.  And nothing fits that bill like a good, classic sausage bake on my breakfast table (or better yet-breakfast in bed) and a hot cup of coffee to go along with it!  The only problem with them is that most recipes I've come across use sour cream.  An ingredient the husband does not like.  I needed to use up the fresh hash browns that I had bought-so I was off to the great wide internet to find a recipe that he would enjoy too.  I came across this recipe at Allrecipes.com and it is fantastic.  Classic, flavorful and feeds plenty.  Perfect.


Sausage, Egg and Hash Brown Bake
Original recipe from Allrecipes.com, slightly adapted by Amy's New Kitchen
Serves 8

Ingredients:
1 package (2lbs) frozen hash browns, thawed (or 1 pkg fresh hash browns)
1 Tbsp canola oil
1 lb breakfast sausage
1 shallot, finely diced
9 eggs
1/2 cup milk
1/2 tsp onion powder
1/2 tsp garlic powder
1/8 tsp salt
1 tsp freshly cracked black pepper
12 oz cheddar cheese, shredded


Heat a skillet over medium heat and add 1 Tbsp oil.  When hot add 1/2 the hash browns and cook until slightly crisp.


Preheat oven to 350 degrees F. Grease a 9x13 baking dish. Place the crisp hash browns in the bottom of the baking dish, then add the rest on top. 


In that same skillet over medium heat cook the sausage and shallot until the sausage is crumbly, evenly browned, and no longer pink; drain. Meanwhile, whisk together the eggs, milk, onion powder, garlic powder, salt and pepper, and pour over the potatoes. Layer with 1/4 of the cheddar cheese, the sausage mixture, and then top with remaining Cheddar cheese. Cover with aluminum foil. 


Bake for 1 hour. Remove cover; return casserole to the oven and bake until cheese turns slightly crisp, about 5-10 minutes. Let stand for 5 minutes before serving. 


The cheese comes out crunchy and delicious, while the layers underneath hold such a nice flavor that you can't even wait to take your next bite.  This was chowed down by my 8 year old nephew-so it has to be good!  ;)