Welcome to my kitchen! This is a blog that is evolving as my life does. I like food, but I don't have all the time in the world to cook. So lately, I'm going with simple, easy recipes. I may switch that up occassionally and post something time-intensive, but that isn't what I'm about these days. If that sounds like you - I hope you enjoy some of these recipes.

Showing posts with label appetizers. Show all posts

Tuesday, September 7, 2010

Zucchini Pesto

Oh man, when I saw this recipe I knew I had to try it!  And since so many people at my work have green thumbs and grow giant zucchini, I needed more recipes just like this to keep my palate happy.


Zucchini Pesto
source: somewhere on the internet...but not really sure where.

Ingredients:
3 medium zucchini (or 1 gigantic homegrown one)
2 tsp sea salt
2 garlic cloves, minced
1/4 cup basil, shredded
1/2 cup almonds, toasted and finely chopped
1 Tbsp thyme leaves, chopped
1/2 cup finely shredded parmesan cheese
Juice from one lemon
1/2 tsp fresh lemon zest
3-4 Tbsp extra virgin olive oil
freshly cracked black pepper
extra sea salt if necessary


Using a box grater, coarsely grate the zucchini.  Place the shredded zucchini on a fresh kitchen towel and sprinkle with salt.  Allow to sit for 5 minutes.  Squeeze the towel to remove all excess moisture that you possibly can.


Put zucchini in a medium sized bowl.  Add the garlic, basil, almonds, thyme, parmesan, lemon juice, lemon zest and 3 Tbsp olive oil.  Stir until well combined.  Add pepper and taste.  Add more salt and olive oil, a little at a time, if necessary.  Refrigerate for at least an hour before serving. 


Serve with pita, pita chips, toasted ciabatta bread, crackers, etc. 

Tuesday, August 31, 2010

Roasted Red Pepper Hummus

Hummus was invented to make me happy, I think.  It's so simple yet can have so many different flavors and versions.  That makes it a fantastic snack or appetizer.  And it's fairly healthy too!  Woot!  This is by far the best hummus I've had and Jeff agreed.  It's soooo good!  Slightly sweet, a little spicy, mmm mmmm.  And I love the color.  It makes a festive addition to any meal.


Roasted Red Pepper Hummus
source: Allrecipes.com, slightly adapted by Amy's New Kitchen
serves: 6-8

Ingredients:
1 (15 oz) can garbanzo beans, drained-reserving the juice
4 oz roasted red peppers
Juice of 1 lemon
1 1/2 Tbsp tahini
1 clove garlic, minced
1/2 tsp cumin
1/2 tsp cayenne pepper
1/4 tsp salt


In a food processor combine all ingredients and pulse/blend until smooth.  Add some of the reserved garbanzo bean juice if necessary to acquire the consistency you desire.  (I probably used 3-4 Tbsp)  Make sure to scrape the bottom and sides of the bowl to ensure all ingredients are well blended.  Serve immediately or store in the fridge until ready to serve.

Saturday, August 21, 2010

Simple Caprese Salad

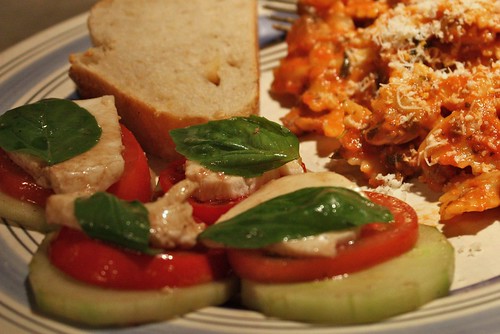
It's summertime and my mom's homegrown tomatoes are rockin'!  I wanted to use them in a simple, fresh way since I don't always get delicious homegrown tomatoes.  Since I already had mozzarella - caprese salad was the obvious choice!


Caprese Salad
Serves 8

Ingredients:
1 cucumber
4 medium tomatoes
12 oz fresh mozzarella
fresh basil
olive oil
balsamic vinegar


Peel the cucumber and slice into 1/4 inch slices.  Remove stems and slice the tomatoes and the mozzarella.  Take the fresh leaves from the basil and add all those ingredients together in a bowl and drizzle with olive oil and balsamic vinegar. 


Place on a platter in individual portions, stacked with the cucumber on the bottom, tomato, mozzarella and a basil leaf on top. 


This is a light, tasty appetizer or side dish to add to any Italian or summertime dish.  I love the fresh basil and the fresh vegetables.  It doesn't get much better.

Thursday, July 29, 2010

Sweet n' Spicy Zucchini Pickles

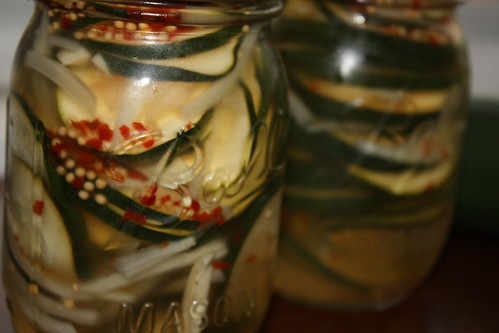
There are lots of recipes out there for zucchini, but plenty of them involve baking or frying.  Neither of which I was up for the other night, so when I found this recipe for Sweet n' Spicy Zucchini Pickles in the latest issue of Cooking Light I was excited!  I hadn't heard of zucchini pickles before but they sounded like fun to me so I made them.  Why not?  They're yummy and totally delicious by themselves as a light snack or on hamburgers or anything that you would use regular pickles for with an extra kick! 


Sweet n' Spicy Zucchini Pickles
source: Cooking Light, August 2010 issue
serves: makes full 2 Ball jars of pickles

Ingredients:
4 cups zucchini, sliced in 1/8" slices
1 cup sweet onions, slivered
3 garlic cloves, thinly sliced
1 cup white vinegar
1/2 cup sugar
3/4 tsp crushed red pepper flakes
1 tsp mustard seeds
3/4 tsp sea salt


Combine vinegar, sugar, red pepper flakes, mustard seeds and salt in a small sauce pan.  Bring to a boil.  While mixture is coming to a boil combine zucchini, onions, garlic in 2 Ball jars.  Pour half the vinegar mixture over the zucchini in each jar.  Fill the rest of the way up with water and refrigerate for at least 24 hours before serving. 


These pickles are so pretty!

These zucchini pickles don't give off their heat right away, but after chewing for a few seconds you will feel the kick!  Then the sweet kicks back in and the flavor that is left in your mouth is fresh and summery.

Sunday, July 25, 2010

Grilled Artichokes with Lemon Mayonnaise Dip

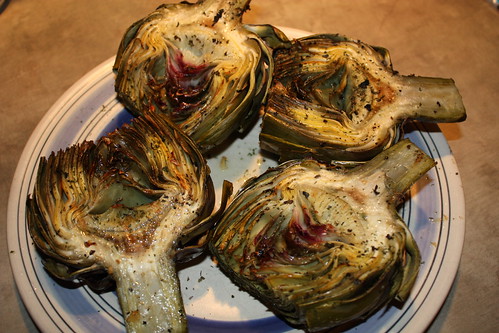
The only way to make an artichoke any more delicious is to grill it.  Jeff and I love to eat out at a restaurant here in Denver called the Cherry Creek Grill.  They have the most amazing seasonal grilled artichokes on their menu and I've always wanted to recreate them at home.  (Although whatever sauce they use is absolutely amazing and I have no idea what is in it.  I will have to see if the waiter will give me some insight next time we're there.)


Grilled Artichokes
Serves 4

Ingredients:
2 cloves garlic
1 bay leaf


2 large artichokes
garlic powder
parsley
sea salt
freshly ground black pepper
1 lemon, halved
olive oil for drizzling


Fill a large pot with about 1" of water and add the garlic cloves and bay leaf to the water.  Place a steamer basket in the water and bring to a boil.


While waiting for the water to boil, prepare the artichokes by washing them then cutting about 1/4" off the end of each stem.  If you like, you can use a vegetable peeler to peel the tough outer layer of the stems away.  Cut about an inch off the tops and trim the pointy tips of the leaves with kitchen shears. 


Place on steamer basket and steam for 20-30 minutes depending on size of artichoke.  You will be able to insert a knife easily into the end of the stem when they are done.  Remove from the pot and set aside to cool for about 10 minutes.  Cut in halves or quarters depending on how many people you will be serving.  Using a sharp knife remove the choke and any purple leaves on the inside of each artichoke.


Preheat your grill.  I like the flavor of a charcoal grill but a gas grill works just fine.  Lightly spread leaves apart and sprinkle garlic powder, parsley, salt and pepper in between the leaves and on the inside.  Squeeze fresh lemon juice on top and drizzle the flat parts of each artichoke with olive oil. 


Grill the artichokes leaf-side down.  Then turn them over and grill just until the tips of the leaves char a little and get some flavor to them.  Remove and serve immediately(with lemon mayonnaise!).

(I forgot to cut out the chokes and inside leaves before we grilled these, so I just did it afterward.)


Lemon Mayonnaise 
Source: Emeril Lagasse, Food Network, slightly adapted by Amy's New Kitchen
Serves: 6-8 portions

2 lemons, halved
1 large egg*
2-3 Tbsp water
1/2 cup olive oil
1/2 cup vegetable oil
1/2 tsp salt
1/2 tsp cayenne


Squeeze the lemon juice into the bowl of a small food processor.  Add the egg* and 1 Tbsp water and process for 20 seconds.  With the processor running slowly pour in the olive oil and vegetable oil through the feed tube and process until emulsified.  (Add additional water, 1 Tbsp at a time to thin the mayo if you like.)  Add the salt and cayenne, pulse to blend.  Transfer to an airtight container and refrigerate for at least an hour before serving.  (Mayo can be refrigerated for up to 24 hours.)

*RAW EGG WARNING (from FoodNetwork.com)
Food Network Kitchens suggest caution in consuming raw and lightly-cooked eggs due to the slight risk of Salmonella or other food-borne illness. To reduce this risk, we recommend you use only fresh, properly-refrigerated, clean, grade A or AA eggs with intact shells, and avoid contact between the yolks or whites and the shell.

Tuesday, June 29, 2010

Cheddar Stuffed Jalapenos

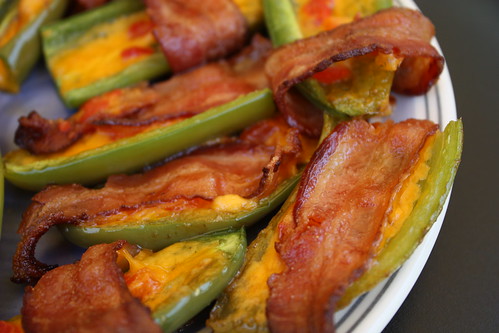
My brother, dad and husband are big fans of peppers.  Most of the time, the hotter the better.  So for Father's Day, I decided to make some stuffed jalapenos for my bro and my dad.  And I guess Jeffrey too since he is a doggy dad!

The only problem with most recipes is that they all involve cream cheese.  An ingredient that Jeff does not approve of.  So, I made up my own and they were a hit!  My 8 year old nephew even loved them-always a bonus!  And they're colorful-which is just they way I like it.


Cheddar Cheese Stuffed Jalapenos 
Servings: 6; 2 per serving

Ingredients:
6 slices bacon
6 jalapenos
4 oz sharp cheddar cheese
2 Tbsp pimentos
Garlic powder


Partially cook bacon slices, side by side, in oven for 8 minutes at 400º on a shallow, rimmed baking sheet.  Do not discard the bacon grease.  Cut each slice of bacon in half and let cool.  Turn oven heat up to 450º.


Split jalapenos in half, lengthwise (removing the stems or not depending on preference), and remove seeds and membranes.  Fill each half of jalapeno with a thick piece of cheese cut to fit jalapeno.  Add pimentos on top, sprinkle with garlic powder and wrap in ½ a piece of bacon, or lay bacon slice on top of jalapeno.  If wrapping in bacon, lay the seams of bacon underneath each jalapeno to keep in place on baking sheet; if necessary secure with a toothpick.  Place closely together on baking sheet (with bacon grease) and bake in oven for 10-12 minutes or until bacon is nice and crisp.


For a spicier pepper leave the membranes in each jalapeno.


These were fun and easy.  But here's a word of warning.....your hands will remain spiced like a jalapeno for hours.  Don't touch your eyes or they will burn!  Trust me.  Next time I will be wearing latex gloves when cutting up the jalapenos.  You better believe it!

Wednesday, June 23, 2010

Roasted Red Pepper Dip

For Father's Day I wanted to make a man's meal.  Grilled meat, grilled veggies, bacon-wrapped jalapeno's, things that sound very manly to me.  I found this recipe for Red Pepper Dip and I knew it was perfect for our appetizer for our Father's day meal.

On a side note - recently, the people at POM Wonderful contacted me to sample their product.  I love pomegranate juice but haven't had this specific brand before so I was excited to try it!  And I was excited for the possibilities of what I could make!

This Red Pepper Dip calls for 1 cup of pomegranate juice, exactly the size of one small POM Wonderful bottle.  Perfect!  My first recipe with pomegranate juice.  :)


Roasted Red Pepper Dip
source: Everyday Food, slightly adapted by Amy's New Kitchen
makes 2 cups

Ingredients:
  • 1 cup pomegranate juice
  • 1 package whole-wheat pitas, 1 pita torn into 1-inch pieces
  • 1/2 cup walnuts, toasted
  • 3/4 tsp paprika
  • 1/2 tsp ground cumin
  • 1/2 tsp cayenne pepper
  • 1 jar (16 oz) roasted red peppers, drained, rinsed, and roughly chopped
  • 1 1/2 tsp fresh lemon juice
  • 1/2 cup extra-virgin olive oil
  • Coarse salt
In a medium sauce pan, simmer pomegranate juice over medium-high until thick and syrupy, ~14 minutes (you should have about 2 Tbsp syrup).


 Meanwhile, in a food processor, process torn pita until coarse crumbs form. Add walnuts, paprika, cumin, and cayenne and process until finely chopped. Add peppers, lemon juice, and syrup then process until mixture is a smooth paste. With machine running, slowly pour olive oil through feed tube and process until well combined. Season with salt and serve with remaining pitas, toasted and cut into wedges.

This dip is not your average dip.  It has a nice little kick to it, which I really like.  I love the tartness that the pomegranate and lemon juices bring to the recipe.   I did add just a little bit more lemon juice than the original recipe called.

Tuesday, May 11, 2010

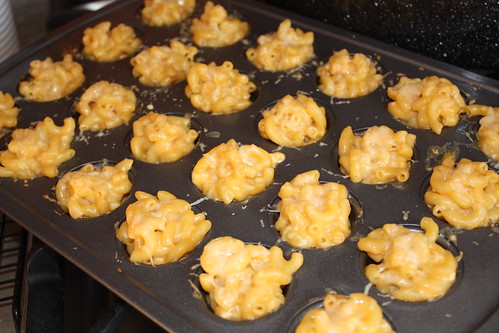
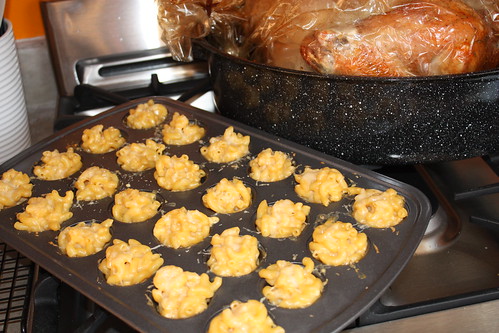
Mini Mac n' Cheese Bites

When I heard there was a such a thing as bite size Mac N' Cheese appetizers I knew I had to make them.  I'm a sucker for a good macaroni and cheese recipe so I love new ways to make it.  This original recipe is from Food & Wine magazine.


Mini Mac n' Cheese Bites
Recipe from Food & Wine Magazine-December 2007 publication
Serves 8

Ingredients:
1/2 lb elbow macaroni
1 1/2 Tbsp unsalted butter, extra for brushing
1/4 cup Parmigian-Reggiano cheese, freshly grated
2 Tbsp all purpose flour
3/4 cup milk
3 oz blue cheese
1 cup cheddar cheese, shredded
4 oz deli sliced American cheese, chopped
1 large egg yolk
1/4 tsp smoked paprika


Preheat the oven to 425°. In a large saucepan of boiling salted water, cook the macaroni until al dente, about 5 minutes. Drain, shaking off the excess water.


Brush two 24-cup, nonstick mini muffin tins with butter. Sprinkle with 2 tablespoons of the Parmigiano; tap out the excess.


In a large saucepan, melt the 1 1/2 tablespoons of butter. Whisk in the flour over moderate heat for 2 minutes. Whisk in the milk and cook, whisking, until boiling, about 5 minutes. Add the cheddar, American and blue cheeses and whisk until melted. Off the heat, whisk in the egg yolk and paprika. Fold in the macaroni.


Spoon slightly rounded tablespoons of the macaroni into the prepared muffin cups, packing them gently. Sprinkle the remaining 2 tablespoons of Parmigiano on top.


Bake the mini macs in the upper and middle thirds of the oven for about 10 minutes, until golden and sizzling. Let cool for 5-6 min­utes. Using a small spoon, carefully loosen the mini macs, transfer to a platter and serve.


We made this recipe as an appetizer to our Thanksgiving feast.  Everyone thought they were super tasty.  I think adding the blue cheese really made them a bit more exotic and special.  What a fun way to bring Mac and Cheese to any meal!

Monday, April 5, 2010

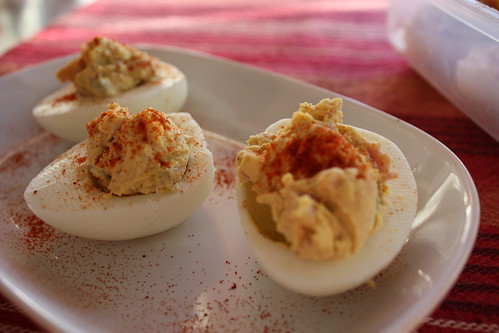
Delicious Deviled Eggs

Deviled eggs might be one of my all time favorite appetizers.  And this is my favorite combination of ingredients to make the ultimate deviled egg.


Deviled Eggs
Serves 5 (4 eggs each)


Ingredients:
10 (hard boiled) Eggs
4 Tbsp Low Fat Mayo
4 Tbsp Dijon Mustard
2 baby Dill Pickles, finely diced
4 slices Ham, diced
Smoked Paprika
Sea Salt


Put eggs in a single layer, covered with lukewarm water in a pot and boil for 10 minutes.  Immediately remove from hot water and transfer to fridge in a container that allows them to be in a single layer.  (This will help make the shells easier to remove.)  When eggs are completely chilled, shell them and cut in half, lengthwise.  Remove all the yolks and set them aside in a medium sized bowl.  Mash the yolks with a potato masher.  Add the mayo, mustard, pickles and ham then mix until combined completely.  I like my deviled eggs a little 'rough' so I don't make my mixture completely smooth-but you could if you like.  Add a sprinkle of sea salt and a dash of paprika to each egg.  Serve cold.


I love the flavor the pickles and the ham brings to the eggs.  They are the first thing to go at potlucks!

Tuesday, March 23, 2010

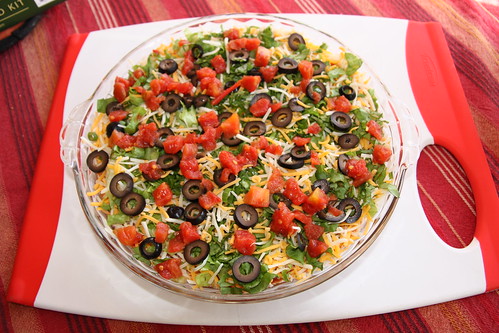
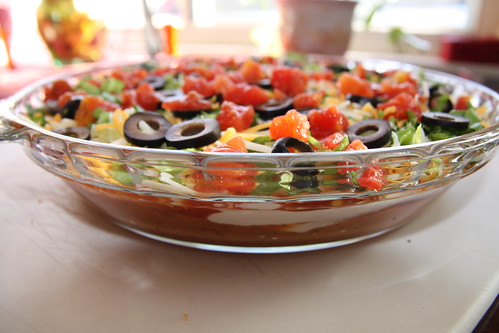
12 Layer Dip

This is my spin on the famous 7 Layer Dip.  I like more layers of flavors, so I put them in my dip.  Don't be shy-add whatever deliciousness you want on your dip.  Get crazy.  Do an avocado layer, put some fresh peppers in there, jalapenos, habaneros, chiles in adobo, whatever tickles your fancy.   This is my go-to recipe:


12 Layer Dip
Serves 6


1 16oz can refried beans
1 packet taco seasoning (or your own blend )
1/2 lb ground meat (beef, turkey, chicken), cooked and drained of all grease
Your favorite hot sauce, in dashes, about 2 tsp
1 cup of salsa
1/2 cup sour cream
1 4oz can diced green chiles
2 cups shredded cheese (I like the mexican style preshredded)
3 Tbsp sliced green onions, diced
1/2 cup lettuce, finely shredded
1/4 cup sliced olives
1 roma tomato, diced (or you could grab a can of Rotel and drain some of those tomatoes)


Mix your refried beans and taco seasoning together until well blended.  Take a glass pie plate and layer the ingredients in the order listed.  I like to put a little cheese in between the lettuce and olive layer for color.  

You can see the lovely layers:

Monday, March 22, 2010

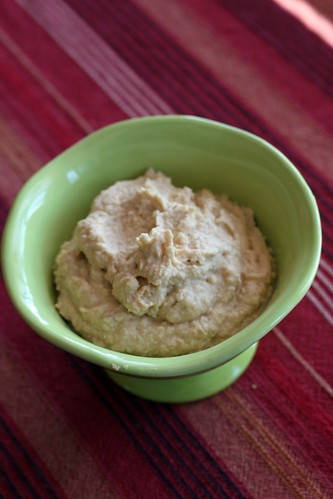
Hummus

I've made this recipe twice now and I absolutely love it.  It's such a simple recipe but packs some pretty good flavor.  It's a spin off from the recipe Hummus III at All Recipes.com


Hummus
Serves 4


Ingredients:
1 14 oz can of chick peas with the juice reserved
3 tsp tahini
One lemon, juiced
3/4 tsp sea salt
2 cloves garlic, pressed
2 Tbsp olive oil
1 pinch of paprika to top it off


Drain the chick peas and reserve the juice in a separate bowl for later.   Add the chick peas, tahini, lemon juice, salt, garlic, and olive oil into a food processor and blend until smooth.  Add juice from the chick peas as often as needed for the consistency you like.  Transfer to another bowl to serve and top with a pinch or 2 of paprika to dress it up.


This is so much better than the store bought hummus.   The recipe is easily doubled, but I only have a mini food prep and it wouldn't hold much more than this.  So I halved the recipe from AllRecipes.com and it works perfectly!  Enjoy!


Wednesday, March 10, 2010

Cheesy Artichoke Triangles

As promised, here are the Pampered Chef, Cheesy Artichoke Triangles that I made for an appetizer for Valentine's Day.  My Grandma gave me a PC recipe book while we were in Texas visiting her last December.  Which is great because I've got a PC Stoneware Bar Pan that needs using!


This recipe was fairly easy actually.  Highly recommended.


Cheesy Artichoke Triangles
Serves: 24 appetizers


2 pkgs (8 oz) refrigerated crescent rolls
2 pkgs (8 oz) lowfat cream cheese, softened
1 lemon
2 eggs
1 clove garlic, pressed
1 can (14 oz) artichoke hearts in water, drained and finely chopped
1 cup (4 oz) parmesan cheese, freshly grated, divided
2 plum tomatos, sliced
2 tbsp chopped fresh parsley
1/2 tsp coarsely ground black pepper


Preheat oven to 375 degrees.  Unroll one package of crescent rolls across one end of the pan.  Repeat with 2nd package of dough on other side of pan.  Roll dough to seal the seam and press dough up and all along the edges of the pan to form the "crust."  Bake 10-12 minutes or until light golden brown and remove from oven.


Meanwhile, cream the cream cheese in mixer until smooth.  Zest lemon for 1 tsp zest.  Add lemon zest, eggs, and garlic to cream cheese.  Mix.  Add finely chopped artichokes and 1/2 cup of the parmesan cheese to cream cheese mixture, mix well.


Spread the artichoke mixture evenly over the crust; arrange tomato slices over filling.  Combine the remaining parmesan cheese, parsley, and pepper in a separate bowl.  Sprinkle mixture on the top of your filling.


Bake 25-30 minutes until light golden brown and set.  Remove from oven and cool 10 minutes.  Cut into 12 squares; cut each square in half diagonally.  


These are absolutely delicious!!  My husband is not a fan of cream cheese and even he loved these.  They make such a nice looking appetizer and are even good heated up afterwards.   I just toasted them up in the toaster oven and they were almost as good as new.