Welcome to my kitchen! This is a blog that is evolving as my life does. I like food, but I don't have all the time in the world to cook. So lately, I'm going with simple, easy recipes. I may switch that up occassionally and post something time-intensive, but that isn't what I'm about these days. If that sounds like you - I hope you enjoy some of these recipes.

Wednesday, June 30, 2010

Pinto Beans with Bacon and Scallions

This is a great version of pinto beans that I will be making again.


Pinto Beans with Bacon and Scallions
Source: Everyday Food by Martha Stewart, adapted by Amy's New Kitchen
Serves: 4

Ingredients:
1 tsp vegetable oil
8 slices bacon, cut into 1/4" pieces
3 bunches scallions, sliced crosswise, separate white and green parts
2 cans pinto beans, drained and rinsed
1 cup water
Salt, to taste
Freshly ground black pepper, to taste


Heat 1 tsp oil in large skillet over medium-high heat.  Add bacon pieces and cook, stirring often until bacon is golden brown.  Add scallion whites and continue to cook until softened.  Add 2 cans pinto beans and 1 cup water and season with salt and pepper. 


Bring to a boil and reduce heat and simmer, stirring occasionally until slightly thickened.  Top with scallion greens and serve immediately.


Mmmmm.  Once I added some extra bacon and scallions to the original recipe it was delicious!  Made everyone happy and was a perfect side to our bbq ribs for Father's Day!

Tuesday, June 29, 2010

Cheddar Stuffed Jalapenos

My brother, dad and husband are big fans of peppers.  Most of the time, the hotter the better.  So for Father's Day, I decided to make some stuffed jalapenos for my bro and my dad.  And I guess Jeffrey too since he is a doggy dad!

The only problem with most recipes is that they all involve cream cheese.  An ingredient that Jeff does not approve of.  So, I made up my own and they were a hit!  My 8 year old nephew even loved them-always a bonus!  And they're colorful-which is just they way I like it.


Cheddar Cheese Stuffed Jalapenos 
Servings: 6; 2 per serving

Ingredients:
6 slices bacon
6 jalapenos
4 oz sharp cheddar cheese
2 Tbsp pimentos
Garlic powder


Partially cook bacon slices, side by side, in oven for 8 minutes at 400º on a shallow, rimmed baking sheet.  Do not discard the bacon grease.  Cut each slice of bacon in half and let cool.  Turn oven heat up to 450º.


Split jalapenos in half, lengthwise (removing the stems or not depending on preference), and remove seeds and membranes.  Fill each half of jalapeno with a thick piece of cheese cut to fit jalapeno.  Add pimentos on top, sprinkle with garlic powder and wrap in ½ a piece of bacon, or lay bacon slice on top of jalapeno.  If wrapping in bacon, lay the seams of bacon underneath each jalapeno to keep in place on baking sheet; if necessary secure with a toothpick.  Place closely together on baking sheet (with bacon grease) and bake in oven for 10-12 minutes or until bacon is nice and crisp.


For a spicier pepper leave the membranes in each jalapeno.


These were fun and easy.  But here's a word of warning.....your hands will remain spiced like a jalapeno for hours.  Don't touch your eyes or they will burn!  Trust me.  Next time I will be wearing latex gloves when cutting up the jalapenos.  You better believe it!

Friday, June 25, 2010

Sloppy Joes

Now I know where they get their name from! Just try and keep the meat from falling out of the bun, I dare you! But seriously-these are awesome. I don't even know the last time I had a Sloppy Joe, but they're delicious and so easy! They're going in to our summer rotation for sure.


Sloppy Joes
original recipe from Allrecipes.com, slightly adapted by Amy's New Kitchen
serves 4

Ingredients:
1 pound lean ground beef
1/2 cup chopped onion
1/2 cup chopped green bell pepper
1/2 teaspoon garlic powder
3/4 cup ketchup
1 tsp prepared yellow mustard
1 tsp spicy brown mustard
1 tsp soy sauce, low sodium
3 teaspoons brown sugar
1 tsp of your favorite hot sauce
salt to taste
freshly ground black pepper to taste

In a medium sauce pan over medium heat, brown the ground beef, onion, and green pepper; drain off any liquids.


Add in garlic powder, ketchup, both mustards, soy sauce, brown sugar, and hot sauce; mix thoroughly. Reduce heat to low and simmer for 30 minutes. Season with salt and pepper.


These would be so easy to make and throw in a slow cooker (on warm) for a party or get together. They have a ton of flavor and are incredibly simple. Great for a quick weeknight meal on a budget too.

Wednesday, June 23, 2010

Roasted Red Pepper Dip

For Father's Day I wanted to make a man's meal.  Grilled meat, grilled veggies, bacon-wrapped jalapeno's, things that sound very manly to me.  I found this recipe for Red Pepper Dip and I knew it was perfect for our appetizer for our Father's day meal.

On a side note - recently, the people at POM Wonderful contacted me to sample their product.  I love pomegranate juice but haven't had this specific brand before so I was excited to try it!  And I was excited for the possibilities of what I could make!

This Red Pepper Dip calls for 1 cup of pomegranate juice, exactly the size of one small POM Wonderful bottle.  Perfect!  My first recipe with pomegranate juice.  :)


Roasted Red Pepper Dip
source: Everyday Food, slightly adapted by Amy's New Kitchen
makes 2 cups

Ingredients:
  • 1 cup pomegranate juice
  • 1 package whole-wheat pitas, 1 pita torn into 1-inch pieces
  • 1/2 cup walnuts, toasted
  • 3/4 tsp paprika
  • 1/2 tsp ground cumin
  • 1/2 tsp cayenne pepper
  • 1 jar (16 oz) roasted red peppers, drained, rinsed, and roughly chopped
  • 1 1/2 tsp fresh lemon juice
  • 1/2 cup extra-virgin olive oil
  • Coarse salt
In a medium sauce pan, simmer pomegranate juice over medium-high until thick and syrupy, ~14 minutes (you should have about 2 Tbsp syrup).


 Meanwhile, in a food processor, process torn pita until coarse crumbs form. Add walnuts, paprika, cumin, and cayenne and process until finely chopped. Add peppers, lemon juice, and syrup then process until mixture is a smooth paste. With machine running, slowly pour olive oil through feed tube and process until well combined. Season with salt and serve with remaining pitas, toasted and cut into wedges.

This dip is not your average dip.  It has a nice little kick to it, which I really like.  I love the tartness that the pomegranate and lemon juices bring to the recipe.   I did add just a little bit more lemon juice than the original recipe called.

Stuffed Bell Peppers

There is nothing like a good stuffed bell pepper.  I've been messing around with the ingredients in my recipe and so far, this is my favorite combo.


Stuffed Bell Peppers
Serves 6

1 lb lean ground beef
1/2 cup chopped onion
1/2 cup frozen whole kernel corn
1 packet Garlic and Herb salad dressing mix
1 can tomato sauce
1/2 cup water
1 cup cooked rice
1 cup Monterey Jack cheese, shredded
6 bell peppers


Brown the ground beef, onions, and corn until the meat is no longer pink.  Drain any grease.  Add the packet of Garlic and Herb salad dressing mix, tomato sauce, water, rice and about 1/4 cup of the shredded cheese.  Stir to mix.  Let simmer until sauce thickens.


Preheat oven to  350º


Cut the tops off the bell peppers and remove the seeds.  Stuff the peppers with the beef mixture and top with the remaining cheese.  Add one cup of water to the bottom of a baking dish.  Place peppers in dish and cover and bake in the oven 30-45 minutes depending on the size of the peppers.  Remove cover halfway through cooking.


Sometimes if we want a little charring for flavor on the peppers we will cut the baking time, then grill them for about 10 minutes until they're tender.  So good!


Thursday, June 17, 2010

Chocolate Chip Cookies

You know how some recipes just bring you back to your childhood? This is one of those for me. This recipe is from a bag of Baker's chocolate chips from more than, oh 25+ years ago. It might still be the same recipe on today's bags, but I'm sure it has changed over the years. This particular one though-is the one my mom always made.


Chocolate Chip Cookies
recipe from Baker's Chocolate

Ingredients:
1 cup softened shortening
3/4 cup firmly packed brown sugar
3/4 cup granulated sugar
1 tsp vanilla
1/2 tsp water
2 eggs

2 cups all-purpose flour
1 tsp baking soda
1 tsp salt
1 cup chopped nuts (I omitted this.  We never put nuts in our CC cookies.)
1 package chocolate baking chips

Beat shortening, sugars, vanilla, water, and eggs until light and fluffy.  Mix flour with soda and salt in separate bowl; blend into shortening mixture.  Stir in nuts (optional) and chips.  Drop 2 inches apart from teaspoon onto greased baking sheets.  Bake at 375° for about 10 minutes or until golden brown.


These cookies are the best because they are slightly crunchy on the outside yet soft in the middle.   That is the key to a good chocolate chip cookie, in my opinion.  They never last long in our house.

Wednesday, June 16, 2010

Cilantro Lime Rice

I love rice.  I'm pretty positive that I could eat rice every day for the rest of my life.  And be completely happy.  When I go to Chipotle, I always ask for extra rice.  Because what is better than rice?  But more rice?! 


This recipe isn't exactly like the rice from Chipotle, but I'm gonna say it-I like it better.  Shhhh-don't tell Chipotle on me.  I still love them  ;-)


Cilantro Lime Rice
Servings: 4


Ingredients:
1 Tbsp olive oil
1 cup basmati rice
2-3 cloves garlic, minced
1 1/2 cups chicken broth, low sodium
3 Tbsp fresh lime juice
1 1/4 tsp sea salt
1/2 cup cilantro, chopped
zest of one lime


Add the oil to a sauce pan then heat on medium heat.  Add the garlic and the rice to the oil.  Saute for about 2 minutes, stirring frequently.


Add the chicken broth, lime juice, and salt to your rice.  Bring to a boil.  Cover and cook on low for 15 minutes.  (If you use a different type of rice-cook the rice according to package directions.)


When the rice is done, add lime zest and cilantro.  Stir to mix and serve immediately. 


We've had this rice in burritos, mixed in with shredded pork, along side fajitas, and more.  It is a great side to any mexican inspired dish.

Monday, June 14, 2010

BBQ Meatballs

I love meatballs.  They're bite size and fun!  And they're easy too, which I really like.  I found this recipe browsing the Pioneer Woman's website and thought it looked interesting so I decided to make it.


BBQ Meatballs
Source: The Pioneer Woman

Ingredients:

For Meatballs:
  • 1½ lbs Ground Beef/Ground Pork mixture
  • ½ cup Oats
  • ½ cup Panko Bread Crumbs
  • ¾ cup Milk
  • 3 Tbsp Very Finely Minced Onion
  • 1½ tsp Salt
  • Freshly Ground Black Pepper, to taste
  • 1 cup all-purpose flour, for dredging
  • canola oil, for frying
For Sauce:
  • 1 cup Ketchup
  • 2 Tbsp Sugar
  • 3 Tbsp Vinegar
  • 2 Tbsp Worcestershire
  • 4-6 Tbsp minced Onion
  • Tabasco (or your favorite hot sauce)
 Preheat oven to 350°


Combine all meatball ingredients. Roll into medium-sized balls and place on a cookie sheet. Place sheet in freezer for five minutes.


After 5 minutes, remove meatballs from freezer and immediately dredge in unseasoned flour.
Brown meatballs in canola oil in skillet on top of stove until just brown. Place into a baking dish.


Combine all sauce ingredients. Pour over meatballs and bake at 350° for 45 minutes. Serve on their own, on a bed of rice or mashed potatoes, or on a bread roll!


I changed a few tiny things from the original recipe.  I used half ground beef and half ground pork.  When I was adding the milk-an entire cup seemed like too much so I stopped at 3/4 cup.  It was the perfect amount.  I also used less oats and added panko bread crumbs because I love them in meatballs.

The bbq sauce is really, really good.  I am a big fan!  I might even suggest to make a double batch of sauce so you have extra for adding sauce on to your bread roll or even just to dip into.

Enjoy!

Friday, June 11, 2010

Our new grill!

Weber.  I love them!

We have the little Smokey Joe from Weber that we take to all of our disc dog competitions, camping, picnics, etc.  But we only had a gas grill at home.  It was a gift from my mom and her husband 4 years ago for our housewarming party, since we were having a BBQ - but had no grill my mom pulled through for us.  It is a great little grill, but it is on the smaller side and let's face it, to really grill-one needs charcoal.  So for our wedding we registered for this bad boy.  And my dad bought it for us!  (Well, let's face it, it's for Jeff-the grill master.)


I love food grilled with charcoal.  I'm so excited to have this new grill finally put together.  We kept it in the box all winter long since we didn't have a cover yet and didn't want to expose it to the winter conditions here.  Once summer hit-that grill was built!  The first item up?  Boneless ribs. :)


Please excuse the fact that we are drinking Twisted Tea.... That's not normally our style. ;-)

We will still be keeping our trusty gas grill, for the days that waiting for the charcoal to heat up just isn't an option.  IE: Amy is hungry and therefore grumpy....must eat food NOW to make Jeff's life better.  But I am so excited to have this new grill.  On the menu soon....spare ribs.  3 racks of them.  And they will all fit in this grill!  Oh this is happening and I can't wait.

Wednesday, June 9, 2010

Cilantro Lime Pesto Pasta

I love cilantro.  I wish there were more recipes to use it since I love it so much.  When I went in search of a cilantro pesto and found this recipe I was in heaven.


Guru's Cilantro Lime Pesto Pasta
Original recipe from: Food Network.com
Serves 6

Ingredients:
  • 1 cup fresh cilantro leaves (do not include stems)
  • 4 tablespoons extra virgin olive oil
  • 4 tablespoons water
  • 2 tablespoons sliced, toasted almonds
  • 4-5 cloves chopped, fresh garlic
  • 1 1/2 teaspoon lime juice
  • 1 cup shredded asiago, divided
  • 1 1/2 teaspoon salt
  • 1/4 cup chicken broth
  • 4 cups pesto sauce
  • 1 cup sun-dried tomato, julienned
 In a food processor mix together cilantro, olive oil, water, almonds, garlic, lime juice, 1/2 cup asiago, salt and chicken broth on low speed for 2 minutes. Set aside. In large saucepan combine your favorite cooked pasta (I used tortellini), pesto sauce, and contents of food processor. Stir. Heat over medium heat for 2 minutes. Pour into serving bowls. Top with remaining asiago and sun-dried tomatoes.


This recipe was good, but it wasn't as saucy as I would've liked.  I did add some extra olive oil and water to the food processor to help lighten the sauce some.  It was a very flavorful side dish though.  I would definitely make it again, but instead of using store-prepared pesto sauce I would rather make my own.  The store stuff is nice if you're in a pinch and don't have time to make any.  Definitely quick and easy!

Tuesday, June 8, 2010

Grilled Glazed Salmon Sandwiches

For Mother's Day my brother and I didn't want to just grill up some chicken and serve it.  We wanted to make something special and colorful-just like our mom.  It just so happens that my trusty subscription of Food & Wine was delivered the day we were talking about what to make!


Grilled Glazed Salmon Sandwiches
recipe from the June 2010 issue of Food & Wine magazine
serves 4

1/4 cup plus 2 Tbsp Dijon Mustard
1/4 cup prepared horseradish, drained
2 Tbsp honey
Four 6 oz skinless salmon fillets
Vegetable oil, for rubbing
Salt
Freshly ground black pepper


In a small bowl, combine the mustard, horseradish, and honey.  
Rub the salmon with oil then season with salt and pepper.  Grill salmon over moderate heat skin side down, until lightly brown.  Rotate and continue grilling until salmon is almost fully cooked through.  Rotate again and brush about 1 Tbsp of the horseradish glaze onto each fillet.   Continue cooking until glaze is set and salmon is done cooking-about 30 seconds and remove from heat.


Serve on a roll with greens of your choice and the rest of the horseradish glaze on the side.


My mom loves salmon.  And I'm not sure how often her and her husband grill it-so I thought this was the perfect meal.  Everyone said it was delicious, and I'll have to take their word for it because I can't eat fish.  Instead of using individual fillets like the recipe suggests, I bought a huge salmon fillet from the deli and we cut each fillet to fit the bread roll.  It worked out really well and the portions were perfect.

Wednesday, June 2, 2010

Welcome to my kitchen!

So since my blog is titled Amy's New Kitchen, I thought some of you might be interested in what my kitchen looks like. (This also helps to post something since I've been gone camping all Memorial Day weekend, and all the awesome food I prepared for the trip, I forgot to take pictures of. Der.)

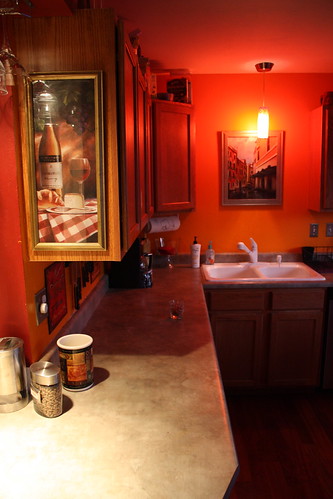
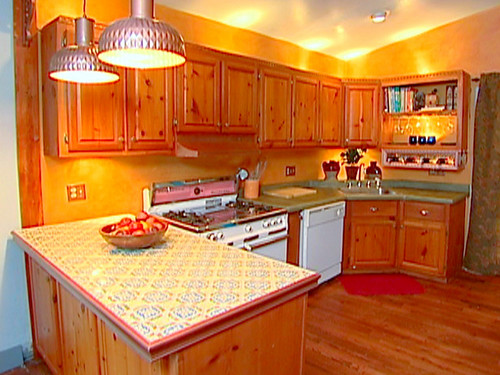
When we moved into our house the kitchen was the best thing in it. Everything was fairly nice and semi-new, except the fridge, but I could deal with that so I was happy. But when we started to remodel the rest of the house, the kitchen really didn't fit our style. So we vamped it up a bit so that it fit 'us'! I love it. I love bright colors and went big with the color for the kitchen. One weekend when Jeff was out of town, I went crazy-and then sent him a picture message to show him my hard work! I'm pretty sure he wrote back, 'Wow-now that's ORANGE!' and was probably pretty frightened to come home...

I had intentions of sponging a darker yellow over the orange to give our kitchen a more Tuscan feel-but that just hasn't happened yet. Maybe one day....

Here is my awesome kitchen.  It's nothing gourmet, but it's home.

Plenty of counter top space!

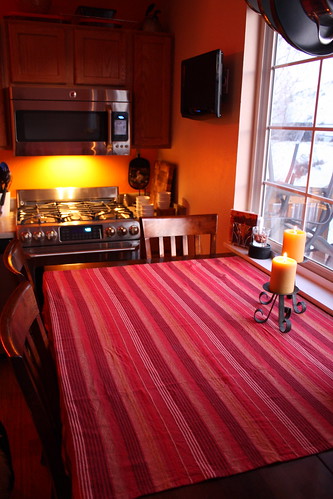
I absolutely love my new gas stove.  We had an electric cooktop before and had a gasline put in so that I could have a gas range.  I love it.  And the double oven isn't bad either.  ;-)
I love that I can watch cooking shows while cooking too!

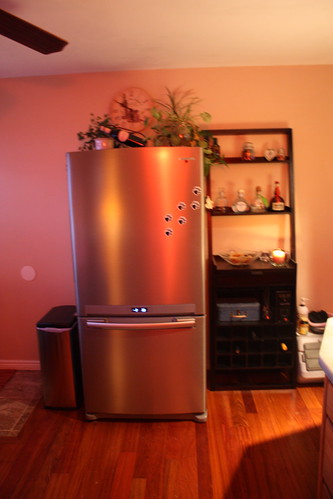
Our old fridge sucked.  There is no other way to put it.  This one was a steal of a deal though.  I think we paid less than $900 for it. 

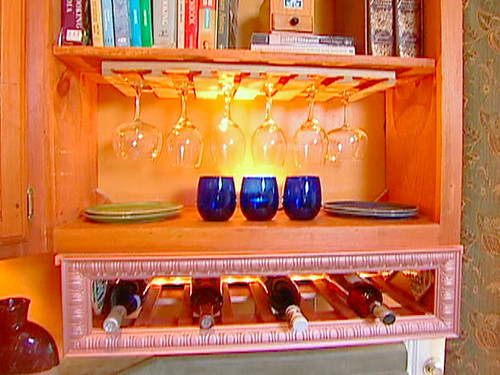
Our wine/liquor rack.

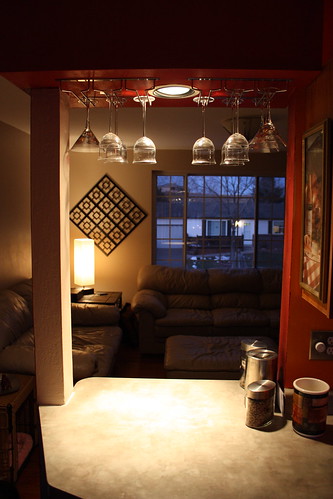
Looking from the kitchen into the living room.

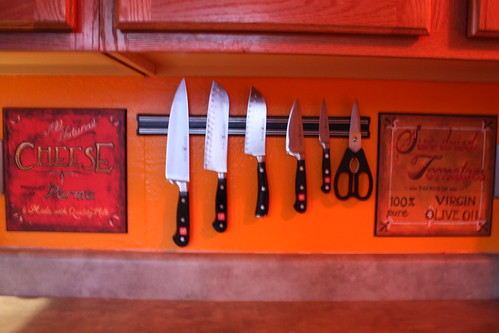
I love my magnetic knife holder.  It keeps all my knives sharp and is easy to access.


These pictures (found here) were the inspiration for what I wanted my kitchen to look like:


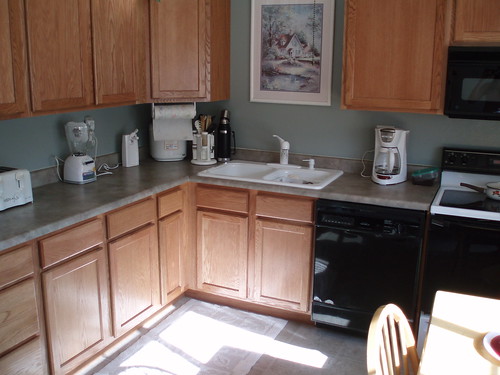
This is what our kitchen looked like originally-4 years ago. A LOT has changed!

So, this is my happy place.  It's my therapy office.  And the gathering place when people come over.  I absolutely adore my kitchen and even more so, adore my husband for making it happen!  He picked out all the appliances and did a fantastic job!  He treats me like a queen and I'm so lucky to have someone who loves me that much to provide me with a kitchen that makes me happy every single time I walk in it.